Sunday, November 11, 2012

Bacon-Wrapped Jalapeno Pheasant

I grew up in a hunting family, and married into a hunting family, which means that there is always wild game in our freezer.  I, however, am not a huge fan of wild game.  When I was growing up, my dad and older brothers hunted deer every year so we always had deer roasts, steaks and burger.  To me, it doesn't matter how you cook it, the wild, gamey taste never leaves, and that's what I don't like about it.  As a kid, I never had the choice of whether I ate it or not.  It was the main meat of wintertime, and we had it a lot.  As an adult, I choose not to eat deer meat, but I am definitely in the minority.  My husband, children and extended family all love it, and that's fine.  I happily prepare it for them while I have something like a salad or a peanut butter sandwich.  I feel the same way about the wild fowl, too.  I don't like duck or goose.  The meat is too dark on both, and ducks are too fatty.  Both of those things gross me out.  I'm sorry - I hope I'm not offending anyone with my opinions.  They are, after all, just that, my opinions.  I am alone in those, also.  My husband and his family think it is a great treat to have a goose and gravy made from it.  To each their own.  There are a select few wild birds that I will eat:  turkey, pheasant and grouse.  I have only had wild turkey a couple of times, but really enjoyed it.  As for pheasant and grouse, if they are cooked just right, where they become tender and lose some of the gaminess, I will eat them.  I usually dredge pheasant in seasoned flour, brown both sides in a little butter and cook in creamy mushroom gravy in a slow cooker.  I serve it with rice, and it turns out pretty well.  Last year, I fried grouse breasts like you would chicken with an egg wash, followed by flour then a seasoned cracker crust.  They were really good, and everyone liked them.  I admit, I haven't experimented a lot with different recipes, as I am still hesitant about having either one very often.  I have to say, though, this recipe is a game changer.  Say it with me, GAME CHANGER.  The first word is "bacon" so how can you go wrong?  I can honestly say, I don't think I've ever had anything with bacon that I didn't love.

My husband came home from his annual, opening weekend of pheasant hunting trip a month ago, loaded down with birds.  "Great," I thought, "Now, I'll have to think of something to do with them.  Awesome."  Then, I was talking to some friends of mine, and they were telling me about their husbands making pheasant breasts wrapped in bacon.  One said that hers also put pickled jalapeno slices in the center.  That really peaked my interest.  If there was ever going to be anything that made me love pheasant, it would be wrapped in bacon with jalapenos.  I tucked that idea in the back of my head for use at a later time.  This weekend was that time.  Here we are at the opening of deer hunting, so it seemed fitting that our Sunday dinner was pheasant.  Let me tell you this, I'm not sure I will ever fix pheasant any other way again.  It was THAT good!  No gaminess.  Great flavor from the bacon.  A little heat from the jalapeno slices without going over the top.  All kinds of moisture from the marinade, which is very important because pheasant can dry out easily.  I can't wait for you to try this recipe!  Just do me a favor, report back in with your thoughts, especially if you are like me, and never really cared for wild game.

Here's your Cast of Characters for the marinade.


1 Cup plain low-fat Greek Yogurt
1/2 Teaspoon, each, ground coriander seed, Lawry's season salt and pepper
1/4 Teaspoon cumin
1 Teaspoon chili powder
1 Teaspoon, each, lime juice, sugar and minced garlic (not pictured - I forgot it)

In a small mixing bowl, combine all ingredients.


Stir well to combine.


It doesn't have a super strong taste but it doesn't need to, with everything else going on with the pheasant.  Set aside for a few minutes.

Here's your Cast of Characters for the Bacon-Wrapped Jalapeno Pheasant.


1 Lb. of pheasant breasts, about 6
Pickled jalapeno slices
1/2 Lb. bacon (I used peppered bacon and it was phenomenal!)
1/2 Cup shredded cheese (I used a Fiesta Blend with Monterey Jack, Cheddar, Queso Quesadilla & Asadero cheeses.)
Several toothpicks

Cut each pheasant breast into 2 pieces.


Place in creamy marinade.


Stir well so that all pieces are coated.


Cover, and refrigerate for at least 1 hour, up to 2 hours.

When the pheasant is done marinating, preheat oven to 275.  Line a cookie sheet with foil (I use Reynolds non-stick, but you can spray it with non-stick cooking spray instead.)

Cut one package of bacon in half.  Refrigerate one half for use at a later time.  Place cheese and several jalapeno slices in separate dishes, and keep toothpicks close at hand.


Take one pheasant breast, place 2 or 3 jalapenos on it, topped with a pinch of cheese.


Fold over, roll up if you can.


Take one slice of bacon, and roll around the pheasant.  Secure with 1 - 2 toothpicks. 


Set on prepared cookie sheet.  Repeat the process with remaining breasts.


Bake for 1 hour, uncovered.  Then, turn oven to 375, and bake for another 30 minutes, or until bacon is crisp and brown.


All of that lovely bacon shared its flavor with the pheasant, and it was a match made in Heaven!
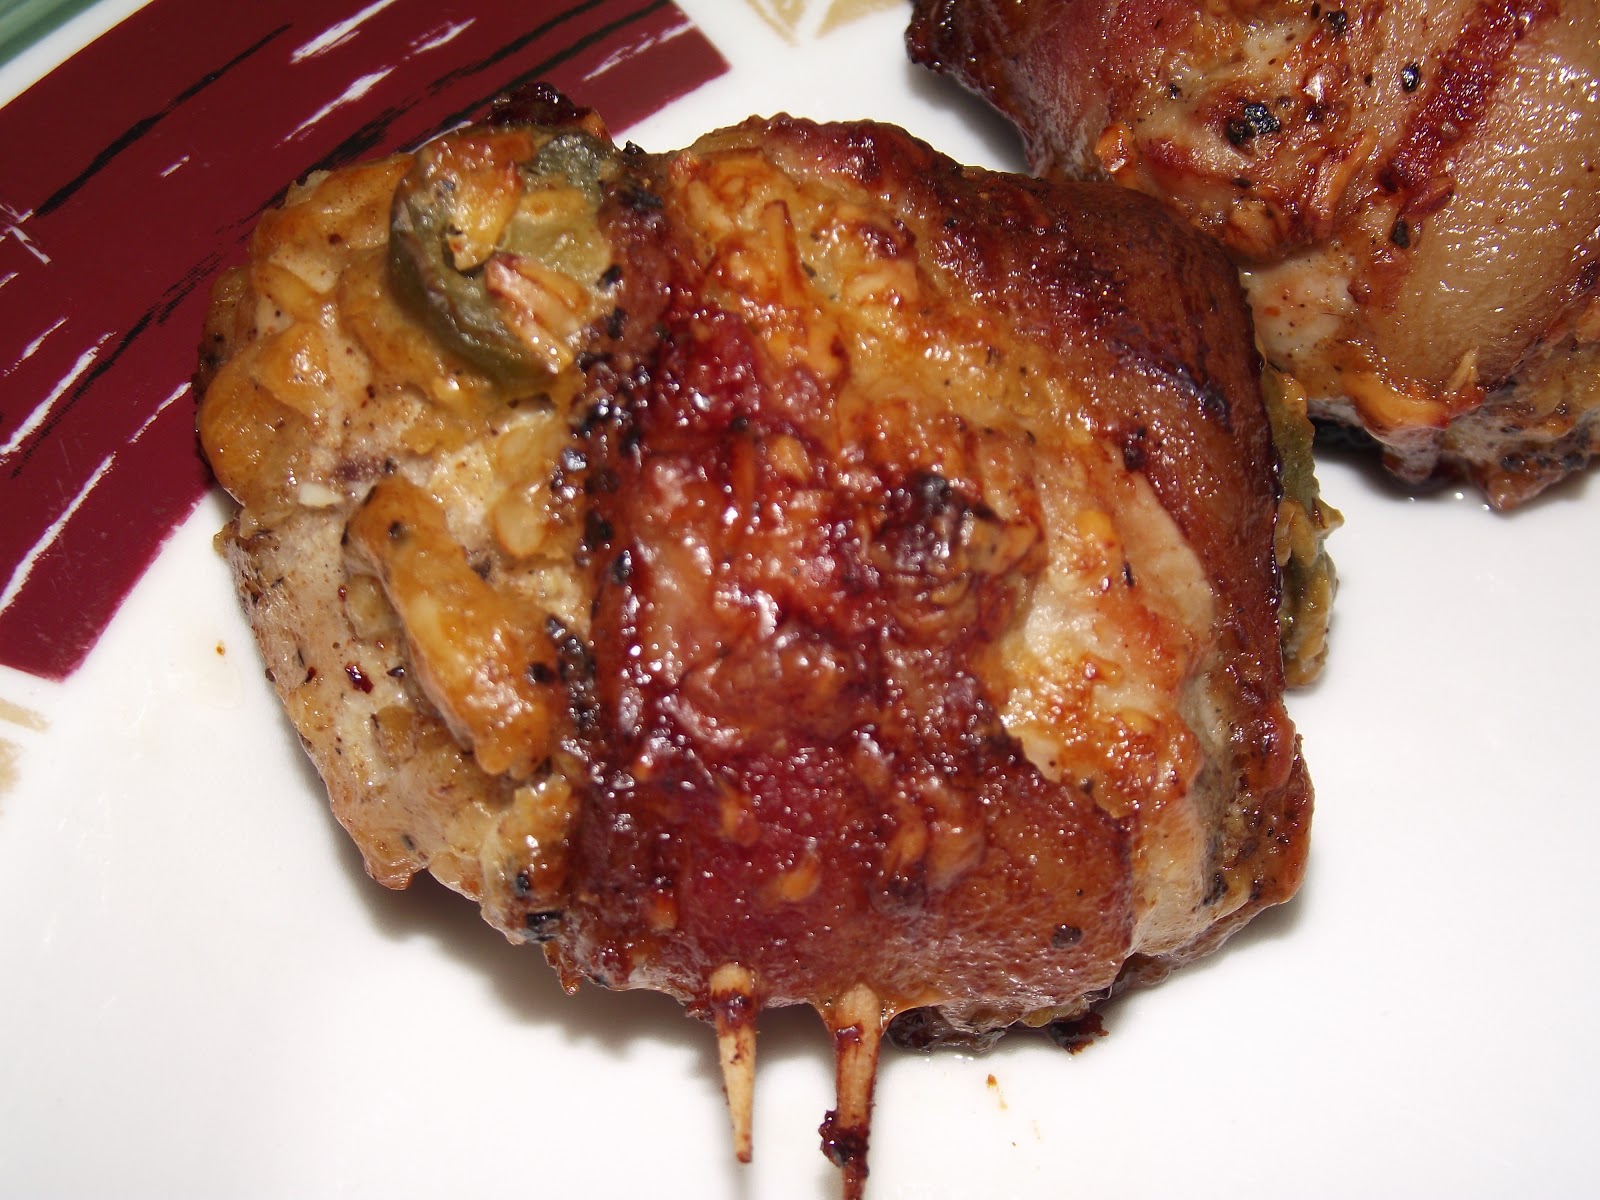


Inside is the pop of the jalapeno, and just a hint of cheese!


Enjoy!


Served with Green Chile Stuffed Shells (tomorrow's recipe) and Fiesta Garlic Green Beans.

*Note:  You can substitute grouse for the pheasant, or chicken breasts if those aren't available or you simply don't like wild fowl.

Saturday, November 10, 2012

Garlic Parsley Potatoes

WARNING - These potatoes are really not good for you!  Not one teeny-tiny bit.  But, I am not going to apologize for that.  Nope.  Every now and then you have to let loose, and enjoy something a little less than healthy.  Okay, a lot less than healthy - they are, after all, drenched in butter.  That's what makes them so good!  And, before you get all bent out of shape, I'm not telling you to eat unhealthy all the time.  Quite the opposite.  Over the last few years, particularly the last one, I have tried to prepare our meals in a healthier fashion.  Things like using more olive oil and less butter, not using cream or half and half nearly as much but using low-fat Greek yogurt to make things creamy and using whole grain pasta whenever I can, just to name a few.  However, while eating healthy and/or dieting,  if you deprive yourself of everything good, you are setting yourself up for failure.  You have to allow yourself a dessert now and then, or take-out from your favorite fast food place.  If you don't, then you'll start obsessing and eventually fall completely off the healthy-eating wagon.  And, no one wants that.  The key is moderation.  Just keep things in proper portions, and you can still have these magnificent butter-doused potatoes.

Speaking of these potatoes, I have been making them for almost 20 years.  Holy cow, that's a long time!  I first found them when I lived in Florida and one of my favorite places to eat was Kenny Rogers Roasters.  Their fire-roasted chicken is to die for but these poatoes, which are no longer on the menu, well, they are just a little slice of heaven.  One of my friends asked if I could figure out how to make them at home.  Challenge accepted - of course I could do this.  Really, it wasn't that hard.  There aren't that many ingredients, but it was finding the right balance. Nonetheless, she thought I was amazing when I first made them.  Who was I to disillusion her?  All that mattered was that we could have these buttery, garlicky potatoes whenever we wanted.  Now I'm going to share them with you.  You're welcome!

Here's your Cast of Characters.


8-10 Medium red-skinned potatoes, scrubbed and eyes removed
1 Stick of unsalted butter
1 Tablespoon minced garlic
1 1/2 Teaspoons Lawry's season salt
1 Teaspoon, each, pepper and McCormick Perfect Pinch Garlic & Herb (or Garlic Powder)
2 Teaspoons parsley

Cut potatoes into bite-size chunks.


Cover with water, bring to a boil, and cook for 20-25 minutes, or until just tender when pricked with a fork.

When the potatoes are almost done, melt butter in a nonstick skillet over medium-low heat.  Add garlic and all the seasonings. 


Continue cooking for for another 2-3 minutes, stirring frequently.


When potatoes are done, drain and place in a large bowl.  Add garlic butter.


Stir very gently to cover all potatoes evenly.


Enjoy!


Friday, November 9, 2012

Customizable Oatmeal Muffins

Since the weekend is upon us, I thought it was a good time to share another breakfast idea.  Where I live, we have some nasty winter weather predicted in the next couple of days.  So, if I'm going to be snowed in, then I might as well get some baking done.  On the agenda:  chocolate chip cookies, more homemade bread and rolls, and these muffins.  Mind you, I don't necessarily enjoy baking.  There are too many rules.  For things to turn out well, you really need to follow the recipe.  That's where it all goes south for me.  I hate following recipes.  Which is what I love about cooking - I can throw in a little of this and a little of that, and when it tastes good, you're done!  Then why am I going to spend the weekend baking, you ask?  Well, it seems a good thing to do on a snowy weekend, and it's not like I never bake.  At the very least, I make snickerdoodle cookies for my dad every year, for Christmas.  It's his favorite cookie, and no one else makes them for him.  And, every now and then, I make quick breads or bars, but not enough where my poor husband gets spoiled!  He definitely has a sweet tooth that doesn't get much satisfaction, but I have a plan to remedy that.  My daughter is becoming quite the baker, and she likes it!  Maybe if I'm lucky, I can get her to make the chocolate chip cookies.  Now that would be awesome!

As for these muffins, I was looking for something a little different than the normal variety.  I knew I wanted something with oatmeal, for the health factor and they'd be more filling.  I searched far and wide before finding a suitable recipe to use as a base.  The reviews looked good, however it was a very basic oatmeal recipe with nothing frilly.  I knew, though, that I could customize it by adding just a few things and have something really tasty.  I was not disappointed!

Here's your Cast of Characters.


2 Cups of milk
2 Cups of quick cooking oats
2 Eggs
1/2 Cup vegetable oil
2 Cups all-purpose flour
1/2 Cup sugar
4 Teaspoons baking powder
1 Teaspoon salt
2/3 Cup dried cherries
1/3 Cup granola or cranberry pecan mix
2 Teaspoons vanilla
2 Teaspoons cinnamon
1 Teaspoon nutmeg

In a small bowl, mix oats and milk.  Let soak 15 minutes.


Preheat oven to 425 degrees.  Grease muffin cups or line with paper liners.

Rough chop your cherries, and cranberries and nuts.


In a large mixing bowl, beat together egg and oil.  Stir into oatmeal mixture, along with all of the other ingredients.  Stir well to combine.  Batter will be thick and lumpy.


Fill muffin cups 3/4 of the way full. 


Bake in preheated oven 20 - 25 minutes, or until a toothpick inserted in the center of a muffin comes out clean.


They should be a nice, golden brown.


Even though I ate the first one warm, straight from the oven, with butter melting, they were actually better the next day, cold without butter or anything.

Makes 24 - 36 large muffins.

Enjoy!

*Note:  You can switch the dried berries up and use what appeals to you.  Also, if you want a little change with the cranberries, use orange juice in place of the milk.

Thursday, November 8, 2012

Quick Lemon Basil Chicken

As much as I love cooking, and I do love cooking, there are days when I just don't feel like doing much in the kitchen.  Days when work started off bad, and never got better, or when a headache has me sidelined and I can't think of anything new and interesting.  Yeah, I had one of those days today, on both counts.  When that happens, I slip into autopilot mode.  I start running through dishes that take very little thought and preparation.  Those things that I could make in my sleep.  No, they're not some of my most inventive recipes, but everyone needs a good base of quick and easy recipes at their fingertips for those nights when you are running to PTA meetings, children's sporting events or you're late leaving work and your favorite tv show will be coming on in a few minutes.  Every night can't be Roasted Artichoke Pesto, and that's okay.  It doesn't mean we compromise flavor, we just take some shortcuts.

This recipe is a winter modification of one of my favorite summer combinations:  lemon and basil.  When warm weather hits, there is nothing more refreshing than a pasta made with fresh lemon juice, and basil from the garden.  I eat it as often as I can, while everything is fresh, then I spend the cold months pining for those flavors.  That's one of the reasons I came up with my Quick Lemon Basil Chicken.  With just a few ingredients, and a marginal amount of time, I can have a meal that soothes my summertime cravings, if only for a little while.

Here's your Cast of Characters.


4-5 Boneless, skinless chicken breasts
2 Tablespoons olive oil
1 Cup chicken broth
1 Tablespoon lemon juice (not pictured)
Lawry's season salt
Pepper
Basil
Lemon pepper

Heat olive oil on medium-low heat in a large non-stick skillet.  Add chicken breasts, and sprinkle generously with all the seasonings.


Cover, turn heat to medium, and cook for 15 minutes, turning once.  Remove cover, and add chicken broth, lemon juice, 1/2 teaspoon, each, Lawry's and basil, and 1 1/2 teaspoons lemon pepper to the pan.  Stir to mix all around. 


Continue cooking, uncovered, for another 10-15 minutes, until chicken is done and most of the liquid has reduced significantly.


Enjoy!

Wednesday, November 7, 2012

Super Simple Spaghetti Squash

Sufferin' succotash, that's a lot of S's, Sylvester!  It could have been worse.  I could have gone all Cindy Brady on you, using the "she sells seashells by the seashore" tongue twister.  As it was, I couldn't think of a better name for this.  It tastes super.  It's very simple.  And, it is spaghetti squash, so you're just going to have to deal with it!

I know that I have mentioned my love of squash before, but I don't think I've really expounded on spaghetti squash.  "Oh, great," you're thinking, "she's going to write an essay about another vegetable."  Okay, maybe I don't need a lengthy speech on the virtues of spaghetti squash.  Perhaps I can sum it up with a few lines, starting with the following question.  How can you go wrong with a squash that masquerades as a pasta?  For those that are trying to cut carbs out of your diet, but love pasta, this is a very healthy alternative.  You can top it with your favorite pasta sauce, and feel a lot less guilt.  No, it doesn't taste like spaghetti, it is still squash, after all, but give it a try.  One of our favorite ways is to make a tomato sauce with Italian sausage, and top the squash with it.  Add a little mozzarella sprinkled over it and put it in the oven to bake for a bit.  Mmmmm, that's good stuff!  Another great thing about it is how truly simple it is to prepare.  This recipe showcases that to perfection.

Although my husband likes the pasta sauce topped squash the best, tonight's recipe is my very favorite way to prepare it.  It doesn't pack a strong flavor punch, but revels in being understated.  No one flavor is a breakout, but they all work together to become something superb.  Fresh sage or dried sage leaves really are the key because squash and sage go hand in hand.  To quote Forest Gump, "They're like peas and carrots."

Here's your Cast of Characters.


1 Small spaghetti squash
2 Tablespoons, each, olive oil and unsalted butter
2 Teaspoons minced garlic
2 Teaspoons chicken bouillon granules
1 Teaspoon McCormick Perfect Pinch Garlic & Herb seasoning
2 Teaspoons freshly ground pepper
1/2 Teaspoon Lawry's season salt
6 - 8 Fresh sage leaves, or dried leaves, crushed
2/3 Cup grated Parmesan cheese, divided

Preheat oven to 400.  Spray a medium casserole with nonstick cooking spray.  Boil spaghetti squash in a covered pot, half-filled with a water, for 25 minutes until tender.  Cut in half and scoop out the seeds.


You can already start to see the "spaghetti" strands!

Use a spoon to go around the edge of the squash, separating the flesh from the skin.


Once you have both sides done, take 2 forks to pull the strands apart, like you are shredding pork or beef.


Place in your prepared casserole.  Add all but 1/3 cup Parmesan cheese.


Stir gently to combine.  Top with remaining 1/3 Parmesan cheese.


Cover and bake for 10 minutes.  Remove cover and continue cooking for another 10 minutes, or until heated through and cheese is melted.


Look at the pieces of garlic and sage!  And, the ooey, gooey melted Parmesan!  Now that's what I'm talking 'bout!


Enjoy!

Tuesday, November 6, 2012

Spicy Garlic Kale Chips

I’d like to tell you about a friend of mine.  We don’t really see much of each other until fall and winter, but that’s the nice thing about our friendship, we can pick right up where we left off.  No hard feelings because we haven’t spent a lot of time together.  No guilt.  It’s all good.  I mean, it’s not like I don’t look for this friend all through spring and summer, but  my friend doesn’t really look the best at those times.  I understand, we all have times that are better than others.  I don’t judge.

And, just who is this friend of mine that is so special and understanding?  Well, it’s not really a who but a what.  Kale.  Have you met my friend, Kale?  If not, do yourself a favor, and make its acquaintance.  You will not regret it.  It’s awesome!

Kale is in the cabbage family, but don’t judge it based on that.  Just as you didn’t get to pick who’s in your family, neither did it.  I love cabbage but I realize not everyone does, so I want to make this clear, kale does NOT taste or smell like cabbage.  It has its own distinct personality.

Plus, it’s a superfood.  There are so many health benefits to kale that I can’t even begin to name them all.  But, let me throw out a couple of the big ones.  First, it’s low in calories, high in fiber and has zero fat.  That is a magnificent trifecta of nutrition!  Second, it is chock full of powerful antioxidants,  such as carotenoids and flavonoids, which help protect against various cancers.  In this day and age, who doesn’t need all the help they can get in that department.  Because there are so many good things about kale, I’m attaching a link to a wonderful article so you can read up on this great friend of mine - Top 10 Health Benefits of Eating Kale.
I love kale in many different forms, balsamic roasted and in Zuppa Toscana soup, to name a couple.  Tonight's recipe is one that I have never made before, but will definitely be making again.  Kale chips have been popping up in blogs across the web for about 2 years so I am not breaking any new ground here.  However, I would be remiss if I didn't do my part to make you aware of them.  You can season them any way you want.  I just happened to decide on a spicy variety.  It doesn't matter how you want to season them, what matters is how good these things are.  They are a healthy alternative to potato chips, that will have you coming back for more until they are all gone.  No, they don't taste like chips, but once you have them nice and crispy, they shatter on your tongue into a million exciting, little pieces.  Very addicting, and so yummy!
Here's your Cast of Characters.
 
1 Bunch of kale, rinsed and COMPLETELY dry (this is huge - no moisture or they won't crisp up)
1 Tablespoon olive oil (not pictured because, quite simply, I forgot it)
Sea salt
Pepper
Chili powder
Garlic powder
Cayenne powder
Preheat oven to 350.
First, remove the ribs from the kale.  I use a sharp knife to cut them out, but you can tear it, too.
 
Next, tear into "chip" size pieces.


Once you have the whole bunch torn up, add 1 tablespoon of olive oil and massage all around, until the pieces are well coated.  If they seem dry, you can add a little more oil, but not too much, or again, they won't get crisp.  For one huge batch, I only used 1 tablespoon and it was plenty. 


Line a couple of cookie sheets with parchment paper, and spread the chips out.  Make sure they aren't crowded.  Sprinkle generously with your seasonings.  I definitely went a little crazy with the chili powder and cayenne, but they were really good!


Bake 8 - 12 minutes, until they are nice and brown, and very crispy.  Just be careful that they don't burn.  Mine took about 10 minutes.


Now, if you don't eat them all, you can seal in an airtight container for one day.  Too crisp them up again, simply put in a toaster oven for a couple of minutes.


Enjoy!
*Note:  If you like what you see, please become a follower to the blog or subscribe to the emails.  And, don't forget, I now have a Facebook page as well:  The Unabashed Kitchen Wench @ https://www.facebook.com/TheUnabashedKitchenWench?ref=hl